Your first game in 15 minutes
Create, publish, and test a first Wheel of Fortune game from an existing campaign in about 15 minutes.
Publish your first playable game and reward in about 15 minutes. Starting from a campaign you already have, you will create one game, link one reward, publish, and test it the way a participant would.
Estimated time: 15 minutes
Before you begin
- You can open OmniLab Campaigns in OmniLab Studio and edit an existing campaign. If you still need a campaign, start with Your first campaign.
- The campaign dates are already set.
- You have a background image, a pointer image, one image for the winning segment, and one simple reward idea ready.
Build and publish the game
Create the wheel
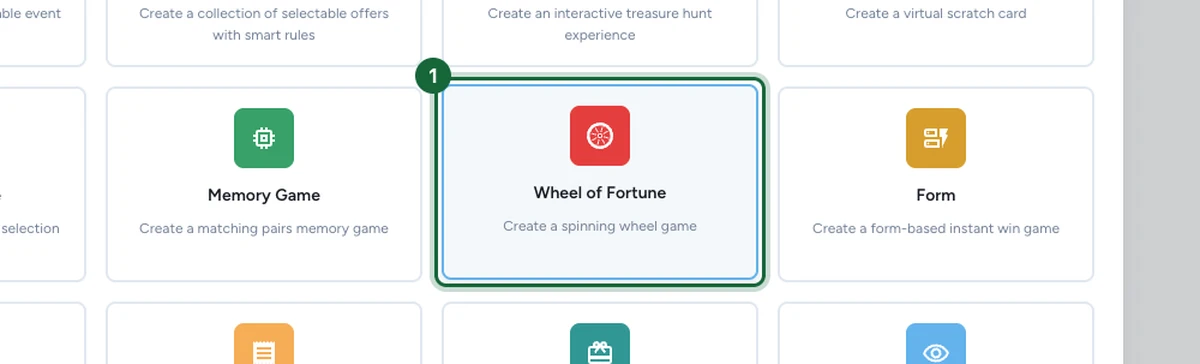
Open the campaign and go to Build -> Touchpoints, then click Add New Touchpoint.
In the Create a new touchpoint window, select Wheel of Fortune and click Create. OmniLab adds the game to your campaign and opens its settings right away.
Fill in the basic appearance
Open Appearance. Give the game a clear player-facing name, upload a Background Image, and add the Title players will see on the game page.
You can add a subtitle and a landing-page thumbnail too, but keep this first setup light. Leave Hide Wheel in Intro Screen off so the wheel shows as soon as the game opens.

Set up a simple wheel design
Still in Appearance, open Custom Wheel Configuration. For a first publishable wheel:
- set Number of Segments to 4
- keep one winning option and one Losing Option
- give the winning option 1 segment and Losing Option 3 segments
- add a name and image to the winning option
- upload a Pointer Image
- save in the wheel builder so OmniLab generates the wheel
You can leave optional styling such as Border & Center Image for later.
Keep the losing option name unchanged
The default losing option must stay named Losing Option. Renaming it blocks publishing.

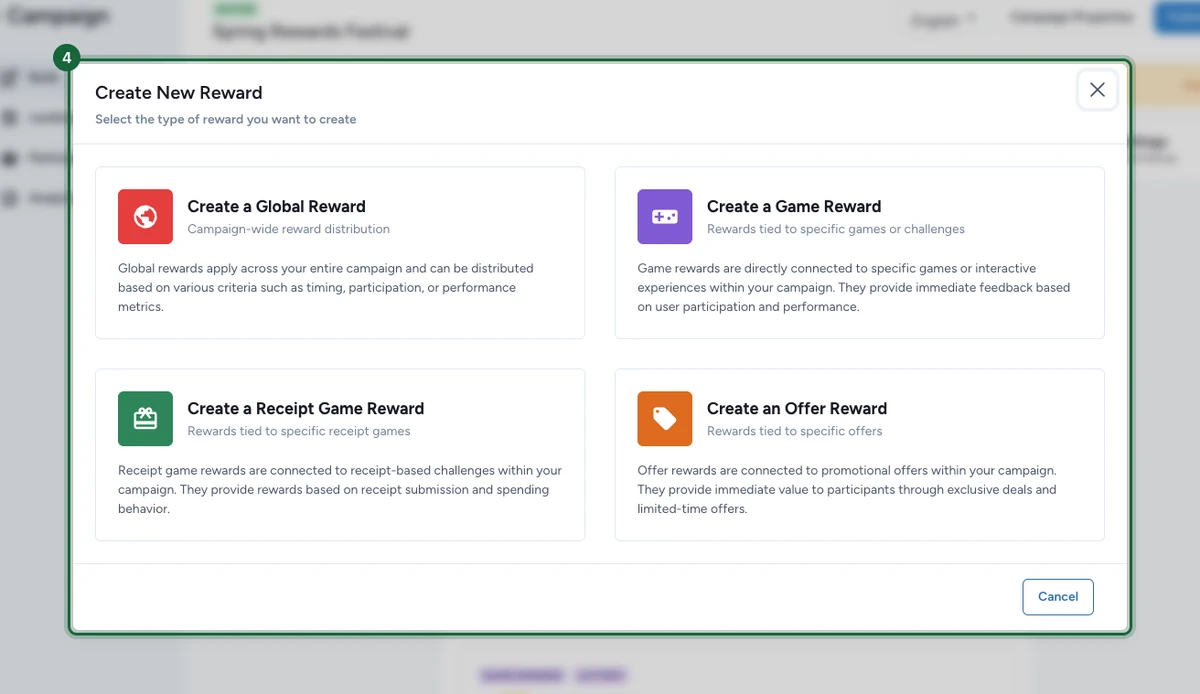
Create one simple reward
Go to Build -> Rewards, click Add New Reward, choose Create a Game Reward, then Luck Based Reward, and pick this game.
Fill in the few fields that matter for a first run:
- Reward Title
- Reward Subtitle
- icon
- Quantity
- winner title and subtitle
Use Simple Mode for this first test, then save the reward.
Link the reward in Outcomes
Return to the Wheel of Fortune game, open Outcomes, and keep Random Chance for this first version.
Open the winning option and select the reward you created. Leave Scheduled Rewards for later, once the basic publish flow works.

Save, check, and publish
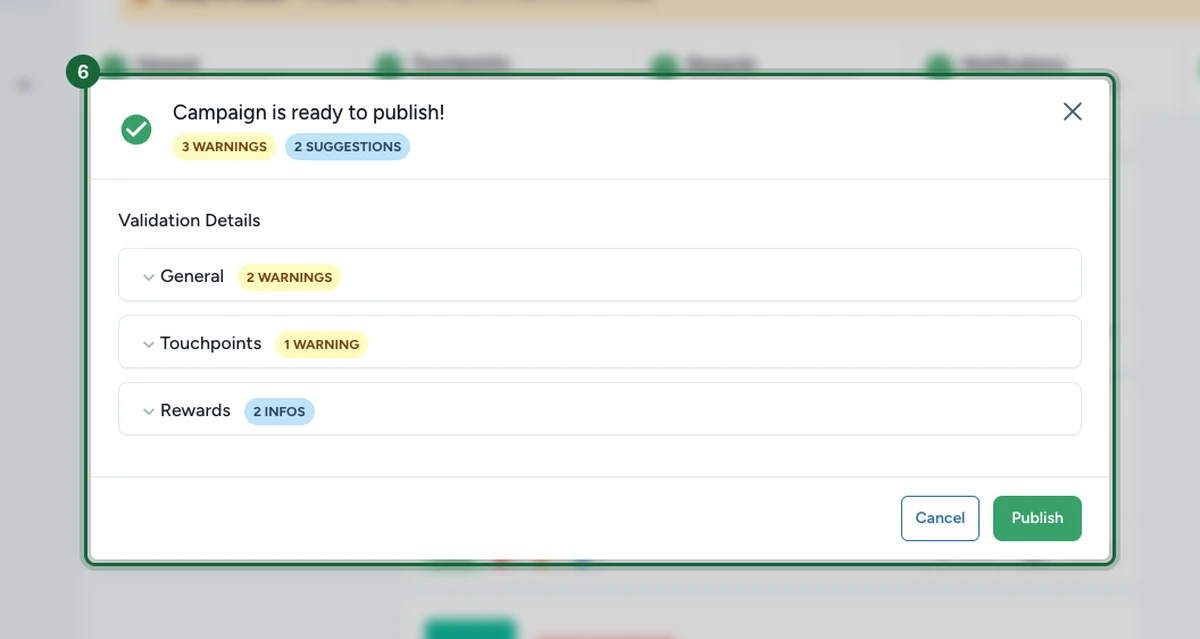
Save the wheel, then click Publish in the campaign.
OmniLab checks the campaign before it goes live. When the modal reads Campaign is ready to publish!, you can go ahead and click Publish — warnings and suggestions are non-blocking. If a blocking error appears instead, fix it, then reopen the check.
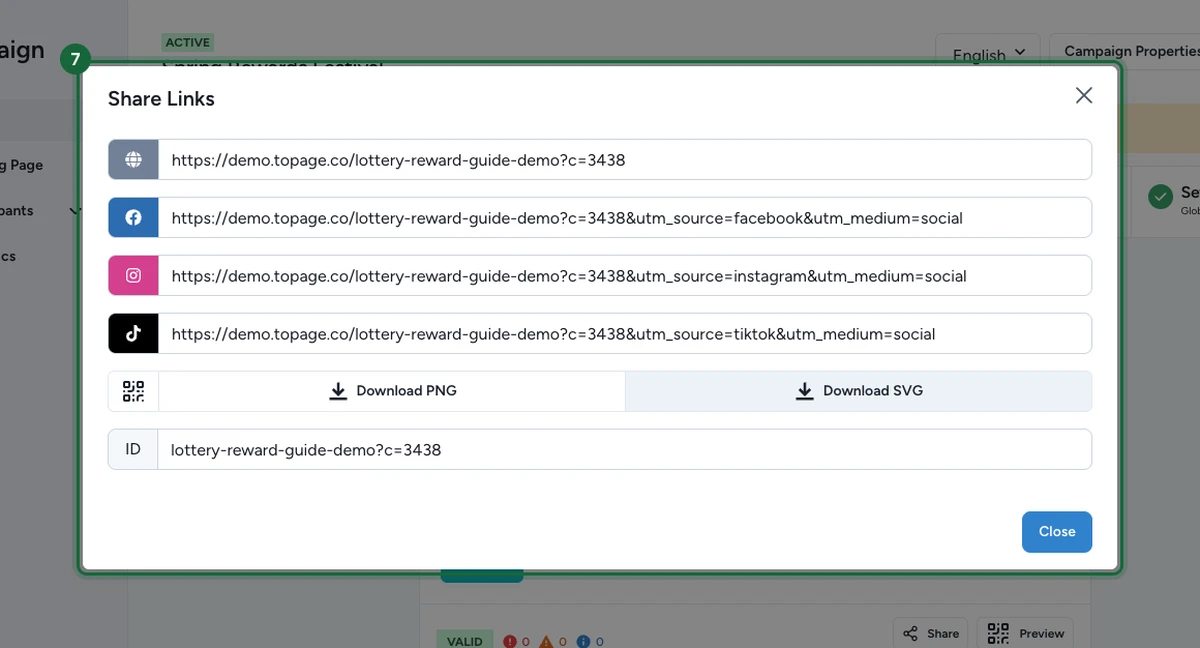
Open the live link and play once
After publishing, return to Build -> Touchpoints and use Share or Preview on the Wheel of Fortune game to open the live link or QR code on a phone.
If your campaign uses a landing page, open the landing-page link or QR code instead of the direct game link.
Play the wheel once from start to finish. Confirm the title, reward, and winner message all behave as expected in OmniLab Pages.
What players see
For a simple first game, participants usually land straight on the game page rather than a landing page. They see your title and subtitle, the wheel itself, and, if you added a description, a How to play? drawer.
When the game starts, the wheel shows the experience you set up. After the spin, the participant sees their reward right away. Depending on your setup, they may also see actions such as Show Results or Go to summary.
If desktop play is turned off for the game, desktop visitors see a QR code instead of the live wheel.
If publishing is blocked
A few common reasons and how to fix them:
- No game set up — go to Build -> Touchpoints and create the Wheel of Fortune game.
- Reward title is missing — add a participant-facing title in the reward's Appearance fields.
- Reward icon is missing — upload an icon in Build -> Rewards, under the reward's Appearance section.
- Reward quantity is zero — set a quantity above zero so the reward can be won.
- Reward not linked to the game — go back to Outcomes and attach the reward to the winning option.
Still blocked after those checks? Reopen Custom Wheel Configuration and confirm the wheel was saved with a pointer image. A Wheel of Fortune cannot publish until its wheel design is complete.
What to try next
Wheel of Fortune
Go deeper on full wheel setup, asset specs, and advanced outcome design.
Configure appearance & branding
Refine the visual polish once the first publish path works.
Link rewards to touchpoints
See the full reward-linking guidance across games and other touchpoints.
Game participation metrics
Track plays, completion, and reward outcomes after launch.